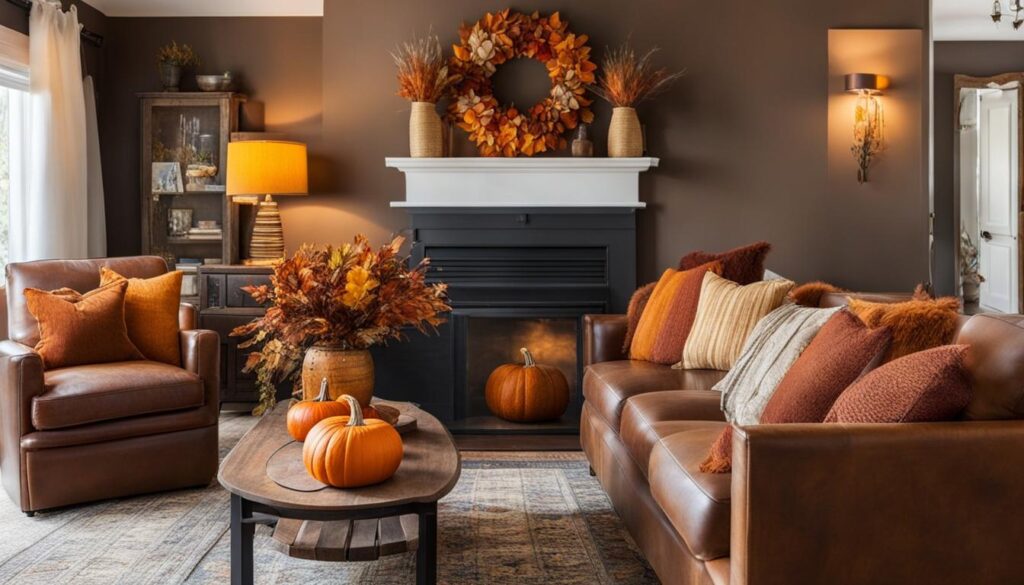
Fall is the perfect time to infuse our homes with cozy and warm decor. DIY projects are a great way to add a personal touch to your space while staying on a budget. We’ve gathered 12 creative and affordable DIY decor ideas that are sure to elevate your home this season. These projects include dried leaf wall art, pumpkin vase centerpiece, sweater pillows, pinecone garland, cinnamon stick candles, book page pumpkins, burlap table runner, twig picture frame, acorn crafts, and mason jar luminaries.
Key Takeaways:
- Bring the essence of fall into your home with upcycled DIY projects.
- Add a personal touch to your space while staying on a budget.
- Elevate your fall decor with handmade items such as dried leaf wall art and pumpkin vase centerpieces.
- Incorporate natural elements like pinecones and twigs for a rustic touch.
- Transform old materials into beautiful and functional decorations.
Dried Leaf Wall Art
For a charming and budget-friendly way to capture the essence of fall in your home, try creating dried leaf wall art. Start by collecting leaves with unique shapes, textures, and vibrant hues. Press the leaves between wax paper or newspaper for one week to preserve their colors and flatten them. Consider framing individual leaves or arranging a mixed collection in a larger frame. Floating frames can add a modern touch and showcase both the front and back of the leaves.
“Dried leaf wall art is a stunning way to bring the beauty of nature indoors while adding a touch of DIY creativity to your fall decor.”
Creating your own dried leaf wall art allows you to showcase the intricate details and vibrant hues of the leaves, bringing a warm and organic feel to your space. Whether you choose to hang the artwork in your living room, bedroom, or hallway, it’s sure to be a focal point that adds a touch of autumn elegance.
Step-by-Step Guide: Creating Dried Leaf Wall Art
-
Step 1: Gather leaves with unique shapes, textures, and vibrant hues.
-
Step 2: Place the leaves between sheets of wax paper or newspaper.
-
Step 3: Stack heavy books or place a flat object on top of the leaves to press them down.
-
Step 4: Leave the leaves pressed for about one week to ensure they are fully dried and flattened.
-
Step 5: Carefully remove the leaves from the paper, being gentle to avoid tearing them.
-
Step 6: Choose a frame that complements the size and shape of the leaves.
-
Step 7: Arrange the dried leaves in the frame, considering the color variations and textures.
-
Step 8: Secure the leaves in place with adhesive or by attaching them to a backing board.
-
Step 9: Hang your dried leaf wall art in a prominent location in your home and enjoy the beautiful autumn display.
With just a few simple steps, you can create a stunning piece of art that celebrates the beauty of autumn and adds a unique touch to your fall decor. Feel free to experiment with different leaf shapes and colors to create a personalized masterpiece that reflects your style and the essence of the season.
| Benefits of Dried Leaf Wall Art | Steps |
|---|---|
| Brings the essence of fall into your home | Gather leaves with unique shapes, textures, and vibrant hues |
| Cost-effective and budget-friendly | Press the leaves between wax paper or newspaper |
| Adds a personalized touch to your fall decor | Stack heavy books or place a flat object on top of the leaves |
| Showcases the intricate details and vibrant colors of leaves | Leave the leaves pressed for about one week |
| Fits different aesthetic styles with various frame options | Carefully remove the leaves from the paper |
| A versatile art piece suitable for any room in your home | Choose a frame that complements the size and shape of the leaves |
Pumpkin Vase Centerpiece
Add a creative twist to your fall decor by turning a pumpkin into a vase centerpiece. Select a pumpkin of your choice and hollow it out, then place a small vase or water-filled container inside to keep your arrangement fresh. Fill the pumpkin vase with late-summer blooms or autumnal elements like colorful leaves, bittersweet vines, or ornamental grasses. This centerpiece will be a stunning addition to your dining table, mantle, or any space in need of a seasonal touch.
Create a visually captivating focal point with a Pumpkin Vase Centerpiece. This DIY fall decor idea combines the natural beauty of pumpkins with the elegance of floral arrangements, making it perfect for adding a touch of autumnal charm to any space. Hollowing out the pumpkin and placing a vase or water-filled container inside provides a functional base for holding the flowers and keeping them fresh. Whether you choose to use vibrant blooms or earthy elements like colorful leaves and vines, the resulting centerpiece will undoubtedly elevate your fall decor.
Sweater Pillows
Give new life to old sweaters by repurposing them into cozy pillowcases. Select sweaters that have lost their shape or have minor flaws but still have good fabric quality. Cut the sweaters into rectangles or squares and stitch three sides together, leaving one end open for the pillow insert. Fill the pillowcase with a snugly fitted pillow and sew up the open end. Add buttons, patches, or other embellishments for an extra touch. These upcycled sweater pillows can be used on sofas, armchairs, or beds, and also make thoughtful homemade gifts.
Get creative and upcycle old sweaters into charming pillowcases to add a touch of warmth and personality to your fall decor. With just a few simple steps, you can transform forgotten sweaters into cozy cushions that bring comfort and style to any space in your Victoria’s Homes.
Start by browsing through your wardrobe or local thrift stores for sweaters that are no longer in use. Look for sweaters that have interesting patterns, textures, or colors that complement your fall decor theme. Don’t worry about minor flaws or stretched-out shapes – these imperfections can add character to your finished pillows.
Once you’ve gathered your sweaters, lay them flat and decide on the size and shape you want for your pillows. Rectangles or squares are the most common options, but feel free to experiment with different shapes to suit your preference.
Using fabric scissors, carefully cut the sweaters according to your chosen measurements. Remember to leave a seam allowance of about half an inch on each side.
Next, place two pieces of sweater fabric together with the right sides facing each other. Pin the edges together to secure them before sewing.
Using a sewing machine or hand sewing needle and thread, stitch along three sides of the fabric, leaving one side open for the pillow insert. Be sure to backstitch at the beginning and end of your seams to reinforce them.
After sewing the three sides, turn the fabric right side out to reveal the finished pillowcase. Press the seams with an iron to give the pillowcase a neat and polished look.
Now, it’s time to insert the pillow into the case. Choose a pillow insert that fits snugly into your pillowcase, ensuring a plump and comfortable result. If you don’t have an insert, you can repurpose an old pillow or stuff the case with polyester fiberfill.
Once the pillow is inside the case, use a hand sewing needle and thread to close the remaining side of the pillowcase. You can use a simple running stitch or a slip stitch for an invisible seam.
For an extra touch of creativity, consider adding buttons, patches, or other embellishments to your sweater pillows. These decorative elements can enhance the overall design and make your pillows truly unique.
Now that your sweater pillows are complete, it’s time to showcase them in your Victoria’s Homes. Place them on sofas, armchairs, or beds to add a cozy and inviting touch to your fall decor. These upcycled sweater pillows also make thoughtful homemade gifts for friends and family.
Pinecone Garland
Create a charming display of fall beauty with a pinecone garland. Start by collecting dry pinecones and sanitize them if desired. Thread a long piece of twine or yarn through the top parts of each pinecone and arrange them evenly or cluster them together for a fuller look. Secure the pinecones in place with thread or hot glue. Hang the garland over your fireplace mantel, along window sills, or even around the base of a dining table centerpiece.
For a rustic touch, you can also incorporate other natural elements like dried leaves, acorns, or small branches into the garland. The combination of textures and earthy tones will enhance the autumnal feel of your home decor.
The pinecone garland adds a natural and organic element to your fall home decor, instantly creating a cozy and inviting atmosphere. It is a versatile and budget-friendly project that can be customized to fit any space or style. Whether you prefer a simple and minimalist garland or a more elaborate and festive design, the pinecone garland is sure to be a stunning addition to your fall decorating scheme.
Materials:
- Dry pinecones
- Twine or yarn
- Thread or hot glue
- Optional: Dried leaves, acorns, or small branches
Instructions:
- Collect dry pinecones and sanitize them if desired.
- Thread a long piece of twine or yarn through the top parts of each pinecone.
- Arrange the pinecones evenly or cluster them together along the twine or yarn.
- Secure the pinecones in place with thread or hot glue.
- Optional: Add dried leaves, acorns, or small branches to the garland by attaching them with thread or hot glue.
- Hang the pinecone garland in your desired location.
Enjoy the natural beauty and cozy ambiance that the pinecone garland brings to your fall home decor. It’s a simple yet elegant DIY project that allows you to bring a touch of the outdoors inside and celebrate the beauty of autumn.

Cinnamon Stick Candles
Add a multisensory experience to your fall home decor with our exquisite cinnamon stick candles. These aromatic crafts will not only enhance the visual appeal of your space but also fill it with the warm and cozy scent of cinnamon.
To create these beautiful candles, start by selecting a pillar candle in your desired color. Then, using a hot glue gun, attach cinnamon sticks vertically around the circumference of the candle. This technique not only adds a rustic touch but also allows the candle to exude the irresistible fragrance of cinnamon as it burns.
To secure the cinnamon sticks in place and add a festive touch, wrap twine or rustic ribbon around the middle of the candle. This will enhance the overall aesthetic and ensure that the fragrance is released evenly throughout the room.
Light the candle and place it in a safe area where you can enjoy both the warm flickering glow and the comforting scent of cinnamon. As the candle burns, the heat will gently warm the cinnamon sticks, intensifying the aroma and creating a cozy atmosphere that is perfect for the fall season.
Our cinnamon stick candles are not only a beautiful addition to your fall home decor but also make wonderful gifts for friends and family. They are an ideal choice for anyone who appreciates the charm of handmade, aromatic crafts.
Benefits of Cinnamon Stick Candles:
- Enhances the visual appeal of fall home decor
- Creates a warm and cozy atmosphere
- Adds a delightful scent of cinnamon
- Made with natural and eco-friendly materials
- Can be customized with different colors and ribbon accents
- Perfect for gifting to loved ones
Cinnamon Stick Candles Inspiration
“The soft glow of candlelight combined with the sweet aroma of cinnamon soothes the soul and invites warmth into any space.”
| An Example of Fall Home Decor with Cinnamon Stick Candles | Description |
|---|---|
| Decorate your dining table with a centerpiece featuring cinnamon stick candles surrounded by autumnal accents like dried leaves and miniature pumpkins. The warm glow of the candles and the aromatic fragrance of cinnamon will create a cozy and inviting ambiance for your fall gatherings. |
Book Page Pumpkins
Repurpose old books into charming book page pumpkins. Cut book pages into strips and create a base using a cardboard circle, foam ball, or mason jar lid. Attach the paper strips to the base, curving them around to resemble a real pumpkin. Add a stem using a real or faux stem, and display your book page pumpkins on a mantel, bookshelf, or as a centerpiece.
Instructions:
- Gather old books that you no longer need or visit a thrift store to find affordable options.
- Using a ruler and pencil, mark where you want to cut each page into strips. The width of the strips can vary depending on your desired pumpkin size.
- Carefully cut along the marked lines to create the book page strips.
- Create a base for your pumpkin using a cardboard circle, foam ball, or mason jar lid. Make sure the base is sturdy enough to support the weight of the paper strips.
- Attach the book page strips to the base using a hot glue gun. Start at the bottom and work your way up, overlapping the strips slightly to create the round shape of a pumpkin.
- Continue attaching the strips until the entire base is covered. Make sure to leave a small opening at the top for the stem.
- Once the glue is dry, add a stem to your book page pumpkin. You can use a real stem from a pumpkin or create a stem using craft materials like twigs or felt.
- Display your book page pumpkins in your desired location, such as a mantel, bookshelf, or as a centerpiece on your dining table.
Materials:
- Old books
- Cardboard circle, foam ball, or mason jar lid for the base
- Hot glue gun
- Ruler
- Pencil
- Craft materials for the stem (real stem, twigs, felt, etc.)
Tips:
When selecting books to use for this project, choose ones that have interesting covers or pages with illustrations to give your book page pumpkins a unique look. You can also experiment with different sizes and shapes for a variety of pumpkin styles.
Inspiration:
| Display Ideas | Materials |
|---|---|
|
|
|
|
|
DIY Burlap Table Runner
Transform a simple strip of burlap into a rustic table runner for your fall table decor. It’s a budget-friendly craft project that adds a touch of rustic charm to your dining experience. Here’s how you can create your own DIY burlap table runner:
- Measure and Cut: Start by measuring your dining table to determine the length and width of the burlap strip. Cut the burlap accordingly, ensuring that it covers the table surface.
- Add Autumnal Designs: Use stencils and seasonal fabric paint to add autumnal designs or phrases onto the runner. Create patterns like leaves, pumpkins, or acorns to enhance the fall theme.
- Embellish with Lace Borders or Twine Tassels: Add extra flair to your DIY burlap table runner by incorporating lace borders or twine tassels. These rustic elements will elevate the look and bring a charming touch to your fall table decor.
The burlap table runner becomes a centerpiece on its own, setting the mood for autumnal gatherings and holiday meals. Its natural texture and earthy tones create a warm and welcoming atmosphere for your guests.
So, gather your materials and get creative with this DIY project. Your homemade burlap table runner will be a beautiful addition to your fall table decor, adding a touch of rustic elegance to your dining experience.
Twig Picture Frame
Bring a bit of nature indoors with a twig picture frame. Collect fallen twigs and adhere them to an existing picture frame using hot glue. Leave the twigs natural or paint them in fall colours. Use the nature-inspired frame to showcase autumnal art, leaf prints, or cherished family photos taken during the fall season.
Adding a rustic touch to your fall home decor, a twig picture frame offers a unique and organic aesthetic. It can be a simple yet striking focal point on a wall or serve as a thoughtful gift for loved ones. The delicate intertwining branches bring the essence of nature indoors and harmonize with other natural elements in your home.
How to Make a Twig Picture Frame:
- Collect fallen twigs in various lengths and thicknesses.
- Clean the twigs and remove any excess debris.
- Choose a picture frame of your desired size and shape.
- Apply hot glue to the back of each twig and press firmly onto the frame, ensuring they overlap slightly for a cohesive look.
- Continue adding twigs until the entire frame surface is covered.
- Let the hot glue dry completely.
- Leave the twigs natural for a rustic appeal or paint them with fall colours like deep oranges, warm browns, or earthy greens.
- Insert your favourite autumnal art, leaf prints, or family photos into the frame.
- Showcase the twig picture frame on a mantel, shelf, or hang it on a wall to bring a touch of nature to any room.
Get creative with your twig picture frame by incorporating other natural elements such as dried flowers, acorns, or small pinecones. The possibilities are endless, and the final result is a truly one-of-a-kind piece of fall home decor.
Complete the look with natural crafts and other fall decor items:
| Fall Home Decor | Natural Crafts |
|---|---|
| Dried Leaf Wall Art | Twig Picture Frame |
| Pumpkin Vase Centerpiece | Pinecone Garland |
| Sweater Pillows | Cinnamon Stick Candles |
| Book Page Pumpkins | Burlap Table Runner |
Conclusion
Transform your home into a cozy and stylish space for the fall season with our collection of 12 creative DIY decor ideas. From dried leaf wall art to pumpkin vase centerpieces and upcycled sweater pillows, there are numerous budget-friendly options to choose from. Infuse your Victoria’s Homes with the warm and organic elements of fall by incorporating pinecones, cinnamon sticks, and natural materials like burlap and twigs.
Whether you’re looking for easy fall decor ideas, affordable DIY fall crafts, or creative upcycling ideas, our projects offer a range of inspirations. Spruce up your hallway, dining table, or living room with these unique DIY fall decor projects. With our Victoria’s home decor ideas, you can add a personal touch to every corner of your abode.
By embracing these upcycled fall decorating tips and undertaking these budget-friendly crafts, you’ll create a home that exudes fall home decor inspiration. So, don’t wait any longer – start your DIY journey and let your creativity shine. Experience the joy of making your own upcycled fall crafts and turn your Victoria’s Homes into a space that reflects your unique style and celebrates the beauty of the autumn season.
FAQ
What is upcycled fall decor?
Upcycled fall decor refers to the practice of repurposing and transforming old or unwanted items into creative and unique decorations for the autumn season.
Why should I consider DIY projects for fall decor?
DIY projects are a great way to showcase your creativity, add a personal touch to your home, and save money by utilizing materials you already have or repurposing items.
How can I create dried leaf wall art?
To create dried leaf wall art, collect leaves with unique shapes and vibrant hues, press them between wax paper or newspaper to preserve their colors and flatten them, and then frame them individually or arrange them in a larger frame.
How can I make a pumpkin vase centerpiece?
To make a pumpkin vase centerpiece, hollow out a pumpkin, place a small vase or water-filled container inside, and fill it with late-summer blooms, colorful leaves, bittersweet vines, or ornamental grasses.
How can I repurpose old sweaters into pillows?
To repurpose old sweaters into pillows, cut the sweaters into rectangles or squares, stitch three sides together, leaving one end open for the pillow insert, fill the pillowcase with a snugly fitted pillow, and sew up the open end. Embellish with buttons or patches if desired.
What can I do with pinecones for fall decor?
With pinecones, you can create a charming pinecone garland by threading twine or yarn through the top parts of each pinecone and hanging the garland over your fireplace mantel, along window sills, or around a dining table centerpiece.
How can I make cinnamon stick candles for fall decor?
To make cinnamon stick candles, attach cinnamon sticks vertically around a pillar candle using a hot glue gun, wrap twine or rustic ribbon around the middle, and light the candle. As the candle burns, the heat will gently warm the cinnamon sticks, releasing their natural aroma.
How do I create book page pumpkins for fall decor?
To create book page pumpkins, cut book pages into strips, create a base using a cardboard circle, foam ball, or mason jar lid, attach the paper strips curving them around the base to resemble a pumpkin, and add a stem. Display the book page pumpkins on a mantel, bookshelf, or as a centerpiece.
How can I make a DIY burlap table runner for fall?
To make a DIY burlap table runner, measure and cut a strip of burlap to fit the length and width of your dining table, use stencils and seasonal fabric paint to add autumnal designs or phrases onto the runner, and embellish with lace borders or twine tassels.
How do I create a twig picture frame for fall home decor?
To create a twig picture frame, collect fallen twigs and adhere them to an existing picture frame using hot glue. Leave the twigs natural or paint them in fall colors. Use the twig picture frame to showcase autumnal art, leaf prints, or cherished family photos taken during the fall season.
How can I incorporate these DIY projects into my Victoria’s Home this fall?
By following these DIY projects, you can infuse your home with cozy and stylish fall decor that is both budget-friendly and reflects your personal style. From dried leaf wall art to pumpkin vase centerpieces, there are a variety of upcycled crafts to create a warm and inviting atmosphere this fall season.